As if I don’t have enough to do already, I’ve just added a new hobby: replacing iPhone screens. Wait, I haven’t done it yet. I plan to do it. The problem is, I’m rough on phones. I’m fast, I’m careless and simply don’t treat my phone as ‘gingerly’ as I should. Lifetime, I think I’ve cracked about 8 screens. That’s almost a G in fix fees if you bring it to someone.
The most recent mishap was a fluke. I was driving home from work. Set my phone in my lap. Pulled up to my apartment and got out of my car and the phone fell onto the ground. Didn’t even remember I put it in my lap. I blame that on working morning show hours. My brain is like tape-delay…just a few seconds behind. Sigh.
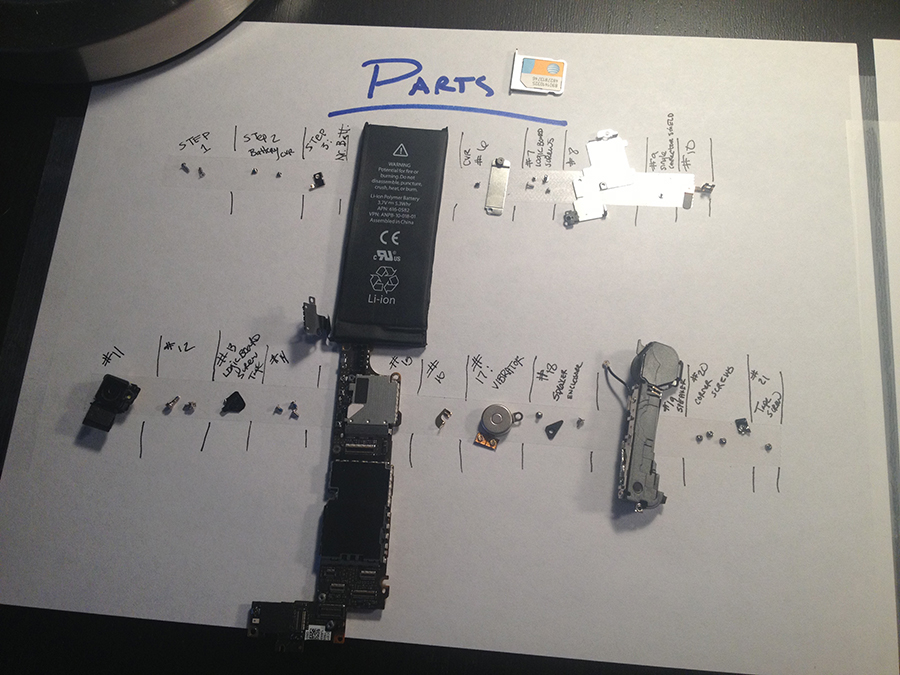
So I’ve been researching how to replace screens myself. This could be a disaster just waiting to happen if it fails. An expensive disaster. But, if it works, then I will gain a little piece of mind knowing if I break it, I don’t necessarily buy it. I fix it.
The instructions are a little nerve-wracking. So I will need to be prepared.
I learned about GSM, touch screens, digitizers, LCD’s – you name it, I learned it when it comes to lingo. Now I’m hoping to apply the new knowledge to successfully fixing a broken phone. That’s if the screens I ordered aren’t completely useless.
I found this helpful blog post that steered me clear of some major headaches right out of the gate:
So, you broke your IPhone 4 screen.
You are not alone. Thousands (millions?) of people just like yourself have been stung by the dreaded iPhone 4 screen disaster. A simple slip of your fingers, a twist of your wrist, a bungled hand off to your wonderful child. As you gasp in shock and watch, as if in slow motion, your beloved iPhone falls victim to gravity and finds its way to the ground. As you lean to pickup your iPhone, which inevitably lands screen-down (just like the butter dish) on the asphalt/concrete (insert name of glass breaking substance here), you realize the screen on your Jesus Phone has shattered, just like your dreams. The first thoughts that pass through your brain are usually “Oh no! Now I have to get a new phone!” – but, we’ve got great news for you – you don’t need a new phone and no matter how much you just cussed and swore at your iPhone, it still loves you and it wants to stay by your side, just with a new screen.
But here’s the deal, there’s a lot of confusion about iPhone 4 screen repair – some important information is being left out of the conversation and we’re here to set you straight about what you need to know to get your iPhone 4 back up and running, with a new shiny screen for those late night FaceTime sessions you’ve come to love so much.
First, let’s toss out some definitions for your edification:
1. Digitizer: AKA Touch-Screen (exhibit A): This is the part of your iPhone you lovingly stroke anytime to want to use it. Your finger knows the silky feel of this glass covered wonder very well. Basically, this is the top glass of your iPhone 4.
2. LCD: This is the Liquid Crystal Display (exhibit B) that shows all those pretty pictures that you’re used to looking at. The LCD is located directly under the Digitizer.
What usually happens when you slam your iPhone 4 to the ground (we know you didn’t do this, but, it happens) is that the glass Digitizer shatters. Your phone may still work, but it’s like driving with a crack in your windshield – things are going to get worse, not better. Now that we’ve defined those two parts, here’s where things get tricky.
On the original iPhone, both the LCD screen and the Digitizer were fused together during the manufacturing process. When the next generation iPhone was released (the 3G), Apple, in its infinite wisdom, decided to separate the LCD screen from the Digitizer. This was great, because it allowed you to just replace the Digitizer when you went crazy and threw your phone through the wall, finally fed up with your AT&T reception problems. Oh, we know this didn’t happen to you…but. Same thing with the LCD – the repair was less expensive, since you could just remove and replace that part alone. The separate screen design was the same for the iPhone 3GS model – life was good.
The iPhone 4 exploded on the scene in June of 2010 and take apart videos began appearing within about 3 seconds of the first person leaving the Apple store. And then, the world stood still as we all realized that Apple had gone “back to the future” and the iPhone 4 screen, that fabulous “Retina Display” LCD and that super slick Digitizer were once again, fused together for eternity.
So, what does this mean and why should you care? Well, confusion reigns in the marketplace and you’ll find all kinds of folks from small towns in Asia selling you an iPhone 4 digitizer all by itself, or an iPhone 4 LCD all by itself. And since you are reading this article and are now educated on this subject – you know that these separate parts are (read this part out-loud) : COMPLETELY WORTHLESS. Yes friends, somewhere across this wonderful land of ours, an excitediPhone 4 user is opening up a cheap LCD or digitizer they bought on eBay and they are still thinking that they got a smoking good deal and are just beginning to try and repair their iPhone 4 screen. They only have a few more minutes of glory before they realize that they have been tricked, scammed, flamboozled, if you will. The part they bought is…yes, COMPLETELY WORTHLESS. There is no way for an end-user to remove the LCD from the Digitizer on the iPhone 4. You need, what is referred to as a “Complete Assembly” that contains the LCD screen + Digitizer + Frame.
Wish me luck. I’ll keep you posted.